
Table of Contents
Open Table of Contents
Introduction
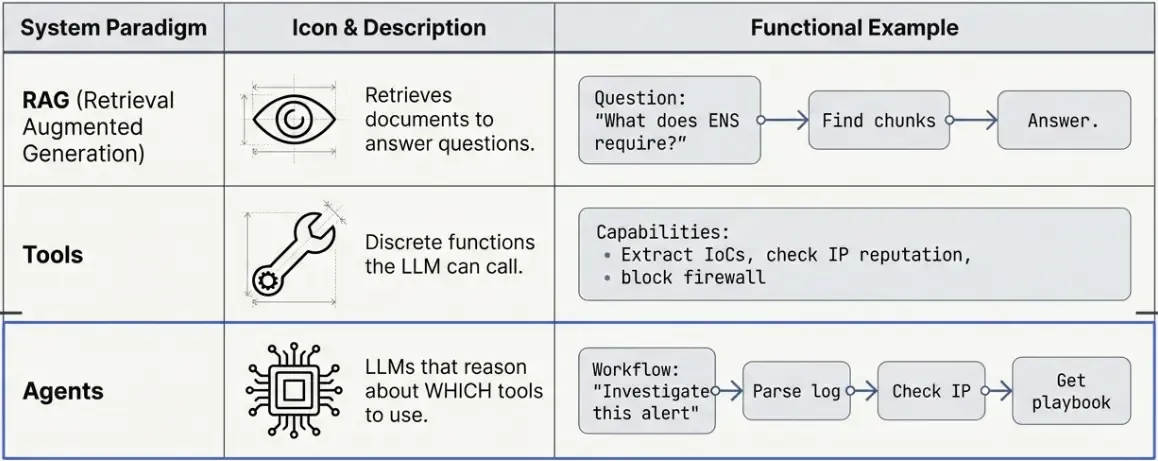
In the previous RAG post, we built a system that retrieves relevant documents and generates answers. But what if we want the LLM to take actions—not just answer questions, but actually DO things?
That’s where LangChain Tools and Agents come in.
What’s the Difference?
What You’ll Learn
In this tutorial, we’ll build a mini SOAR (Security Orchestration, Automation and Response) assistant that can:
- Extract Indicators of Compromise (IoCs) from text
- Check IP reputation against threat intelligence
- Parse syslog entries
- Generate incident timelines
- Recommend response playbooks
All using LangChain’s tool system and a simple agent.
Understanding LangChain Tools
What is a Tool?
A LangChain tool is simply a Python function decorated with @tool. The key insight is that the docstring tells the LLM when and how to use it.
from langchain_core.tools import tool

@tool
def hello_security(name: str) -> str:
    """
    Say hello to a security analyst.
    Use this when you need to greet someone.
    """
    return f"Hello, {name}! Welcome to the SOC."

# Test it
print(hello_security.invoke("Carlos"))
# Output: Hello, Carlos! Welcome to the SOC.
The Docstring is Critical
The LLM reads your docstring to understand:
- What the tool does
- When to use it
- What parameters it needs
# Let's see what the tool looks like to the LLM
print("Tool name:", hello_security.name)
print("Tool description:", hello_security.description)

# Output:
# Tool name: hello_security
# Tool description: Say hello to a security analyst.
# Use this when you need to greet someone.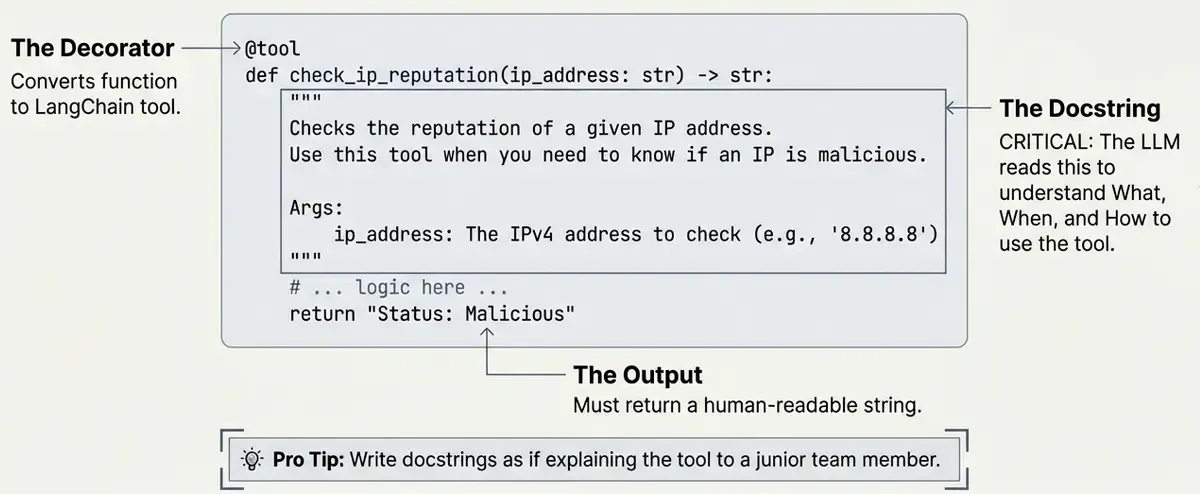
💡 Pro tip: Write docstrings as if explaining to a new team member when they should use each tool.
Building Security Tools
Let’s build 5 practical tools for security operations.
Tool 1: IoC Extractor (Forensics)
This tool extracts Indicators of Compromise from text using regex patterns.
Why regex? For simple IoC extraction, regex is fast, reliable, and doesn’t require ML models. Perfect for learning and lightweight production use.
import re

# Define regex patterns for common IoCs
PATTERNS = {
    "ip": r"\b(?:(?:25[0-5]|2[0-4][0-9]|[01]?[0-9][0-9]?)\.){3}(?:25[0-5]|2[0-4][0-9]|[01]?[0-9][0-9]?)\b",
    "domain": r"\b[a-zA-Z0-9][a-zA-Z0-9-]{0,61}[a-zA-Z0-9]?\.[a-zA-Z]{2,}\b",
    "md5": r"\b[a-fA-F0-9]{32}\b",
    "sha256": r"\b[a-fA-F0-9]{64}\b",
}
Now let’s wrap this in a LangChain tool:
@tool
def extract_iocs(text: str) -> str:
    """
    Extract Indicators of Compromise (IoCs) from text.

    Finds: IP addresses, domains, MD5 hashes, SHA256 hashes.
    Use this to analyze security reports, logs, or alerts.
    """
    results = {}

    for ioc_type, pattern in PATTERNS.items():
        matches = list(set(re.findall(pattern, text)))
        if matches:
            results[ioc_type] = matches

    if not results:
        return "No IoCs found in the text."

    # Format output for readability
    lines = ["Extracted IoCs:"]
    for ioc_type, values in results.items():
        lines.append(f"  {ioc_type.upper()}: {', '.join(values)}")

    return "\n".join(lines)
Test it:
security_alert = """
Alert: Malware detected!
Source IP: 185.220.101.34
Contacted: malware-c2.evil.com
File hash: d41d8cd98f00b204e9800998ecf8427e
"""

result = extract_iocs.invoke(security_alert)
print(result)
Output:
Extracted IoCs:
  IP: 185.220.101.34
  DOMAIN: malware-c2.evil
  MD5: d41d8cd98f00b204e9800998ecf8427e
Tool 2: Threat Intelligence Lookup
This tool checks if an IP address is known to be malicious.
In production: You’d call APIs like VirusTotal, AbuseIPDB, or your internal threat intel platform.
For learning: We’ll use mock data to demonstrate the pattern.
# Mock threat intel database
THREAT_DATABASE = {
    "185.220.101.34": {"risk": "high", "type": "Tor Exit Node", "reports": 150},
    "45.33.32.156": {"risk": "medium", "type": "Scanner", "reports": 45},
    "192.168.1.100": {"risk": "low", "type": "Internal", "reports": 0},
}

@tool
def check_ip_reputation(ip_address: str) -> str:
    """
    Check the reputation of an IP address.

    Returns risk level and threat information.
    Use this to investigate suspicious IPs.
    """
    if ip_address in THREAT_DATABASE:
        info = THREAT_DATABASE[ip_address]
        return (
            f"IP: {ip_address}\n"
            f"Risk Level: {info['risk'].upper()}\n"
            f"Type: {info['type']}\n"
            f"Abuse Reports: {info['reports']}"
        )
    else:
        return f"IP {ip_address}: No threat data found (possibly clean)."
Test it:
print(check_ip_reputation.invoke("185.220.101.34"))
# Output:
# IP: 185.220.101.34
# Risk Level: HIGH
# Type: Tor Exit Node
# Abuse Reports: 150

print(check_ip_reputation.invoke("8.8.8.8"))
# Output:
# IP 8.8.8.8: No threat data found (possibly clean).
Tool 3: Syslog Parser
This tool parses syslog entries and extracts structured information.
@tool
def parse_syslog(log_line: str) -> str:
    """
    Parse a syslog line and extract key information.

    Extracts: timestamp, host, process, and message.
    Use this to analyze individual log entries.
    """
    # Syslog pattern: Month Day Time Host Process[PID]: Message
    pattern = r"^(\w{3}\s+\d+\s+\d+:\d+:\d+)\s+(\S+)\s+(\S+?)(?:\[\d+\])?:\s+(.+)$"

    match = re.match(pattern, log_line)
    if match:
        timestamp, host, process, message = match.groups()
        return (
            f"Timestamp: {timestamp}\n"
            f"Host: {host}\n"
            f"Process: {process}\n"
            f"Message: {message}"
        )
    else:
        return "Could not parse log line."
Test it:
log = "Jan 22 08:15:23 webserver01 sshd[12345]: Failed password for invalid user admin from 203.0.113.50 port 54321 ssh2"

result = parse_syslog.invoke(log)
print(result)
Output:
Timestamp: Jan 22 08:15:23
Host: webserver01
Process: sshd
Message: Failed password for invalid user admin from 203.0.113.50 port 54321 ssh2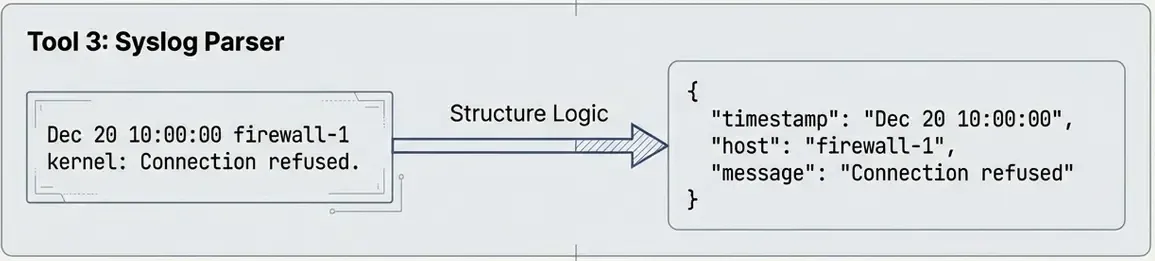
Tool 4: Timeline Generator
This tool organizes security events in chronological order—essential for incident investigation.
from datetime import datetime

@tool
def create_timeline(events: list[dict]) -> str:
    """
    Create a chronological timeline from events.

    Each event should have 'time' and 'description' keys.
    Use this to understand the sequence of an attack.
    """
    if not events:
        return "No events provided."

    # Sort by time
    sorted_events = sorted(events, key=lambda x: x.get("time", ""))

    lines = ["📅 INCIDENT TIMELINE", "=" * 40]

    for event in sorted_events:
        time = event.get("time", "Unknown")
        desc = event.get("description", "No description")
        severity = event.get("severity", "info")

        # Add emoji based on severity
        emoji = {"critical": "🔴", "high": "🟠", "medium": "🟡", "low": "🟢"}.get(severity, "⚪")

        lines.append(f"{emoji} [{time}] {desc}")

    return "\n".join(lines)
Test it:
attack_events = [
    {"time": "08:15:23", "description": "Multiple failed SSH logins", "severity": "medium"},
    {"time": "08:16:30", "description": "Successful login as 'deploy'", "severity": "high"},
    {"time": "08:17:45", "description": "Privilege escalation to root", "severity": "critical"},
    {"time": "08:18:02", "description": "Downloaded malicious script", "severity": "critical"},
    {"time": "08:19:00", "description": "Created persistence via cron", "severity": "high"},
]

# Important: Pass arguments as a dictionary!
result = create_timeline.invoke({"events": attack_events})
print(result)
Output:
📅 INCIDENT TIMELINE
========================================
🟡 [08:15:23] Multiple failed SSH logins
🟠 [08:16:30] Successful login as 'deploy'
🔴 [08:17:45] Privilege escalation to root
🔴 [08:18:02] Downloaded malicious script
🟠 [08:19:00] Created persistence via cron
⚠️ Common gotcha: When invoking tools with complex arguments (dicts, lists), always pass them as
{"param_name": value}, not directly.

Tool 5: Playbook Finder
This tool suggests response actions based on incident type.
In production: You’d use RAG to search your playbook knowledge base (see previous post).
For learning: We’ll use a simple dictionary lookup.
# Simple playbook database
PLAYBOOKS = {
    "brute_force": [
        "1. Block the attacker IP at the firewall",
        "2. Reset passwords for targeted accounts",
        "3. Check for successful logins from the IP",
        "4. Enable account lockout policies",
    ],
    "malware": [
        "1. Isolate the affected system from network",
        "2. Collect memory dump and disk image",
        "3. Identify the malware family",
        "4. Check for lateral movement",
        "5. Clean and rebuild the system",
    ],
    "data_breach": [
        "1. Identify what data was accessed",
        "2. Determine the scope of exposure",
        "3. Notify legal and compliance teams",
        "4. Preserve evidence for investigation",
        "5. Prepare breach notification if required",
    ],
}

@tool
def get_playbook(incident_type: str) -> str:
    """
    Get the response playbook for an incident type.

    Supported types: brute_force, malware, data_breach.
    Use this to get step-by-step response guidance.
    """
    incident_type = incident_type.lower().replace(" ", "_")

    if incident_type in PLAYBOOKS:
        steps = PLAYBOOKS[incident_type]
        return f"📋 {incident_type.upper()} RESPONSE PLAYBOOK\n\n" + "\n".join(steps)
    else:
        available = ", ".join(PLAYBOOKS.keys())
        return f"No playbook found for '{incident_type}'. Available: {available}"
Test it:
print(get_playbook.invoke("brute_force"))
# Output:
# 📋 BRUTE_FORCE RESPONSE PLAYBOOK
#
# 1. Block the attacker IP at the firewall
# 2. Reset passwords for targeted accounts
# 3. Check for successful logins from the IP
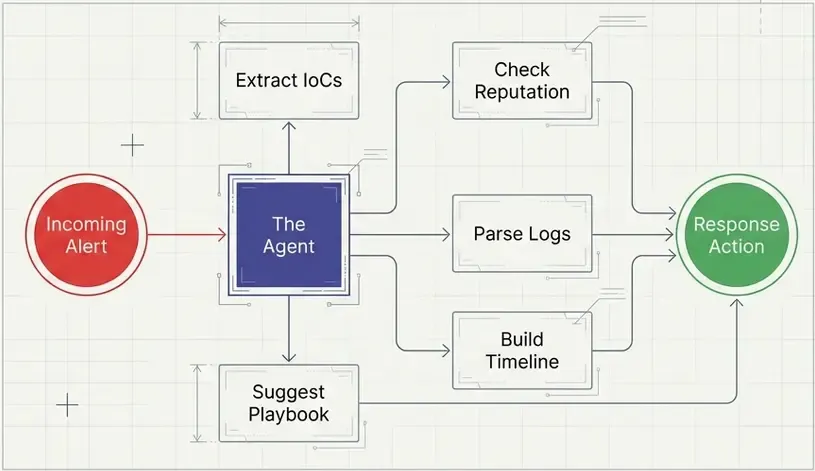
# 4. Enable account lockout policiesCreating the SOAR Agent
Now let’s combine all our tools with an AI agent that decides which tools to use!
Setting Up the Agent
from langchain_openai import AzureChatOpenAI
from langchain.agents import create_agent
import os

# Create LLM (works with any OpenAI-compatible API)
llm = AzureChatOpenAI(
    azure_endpoint=os.getenv("AZURE_OPENAI_ENDPOINT"),
    api_key=os.getenv("AZURE_OPENAI_API_KEY"),
    api_version=os.getenv("AZURE_OPENAI_API_VERSION", "2024-06-01"),
    azure_deployment=os.getenv("AZURE_OPENAI_CHAT_DEPLOYMENT_NAME", "gpt-4o-mini"),
    temperature=0,  # Deterministic for consistent responses
)

# Our tools
my_tools = [
    extract_iocs,
    check_ip_reputation,
    parse_syslog,
    create_timeline,
    get_playbook,
]

# Create agent
agent = create_agent(
    model=llm,
    tools=my_tools,
    system_prompt="""You are a SOC analyst assistant.
Use your tools to investigate security incidents.
Be thorough and explain your findings."""
)

print(f"✅ Agent created with {len(my_tools)} tools!")
Testing the Agent
Let’s give the agent a real security task:
result = agent.invoke({
    "messages": [(
        "human",
        """I found this in our logs:

        Jan 22 08:15:23 webserver01 sshd[12345]: Failed password for admin from 185.220.101.34

        Can you parse this log, check if the IP is malicious, and tell me what to do?"""
    )]
})

print("🤖 Agent Response:")
print(result["messages"][-1].content)
Output:
### Log Analysis
- **Timestamp:** Jan 22 08:15:23
- **Host:** webserver01
- **Process:** sshd
- **Message:** Failed password for admin from 185.220.101.34

### IP Reputation Check
- **IP Address:** 185.220.101.34
- **Risk Level:** HIGH
- **Type:** Tor Exit Node
- **Abuse Reports:** 150

### Response Playbook for Brute Force Incident
1. **Block the attacker IP at the firewall.**
2. **Reset passwords for targeted accounts.**
3. **Check for successful logins from the IP.**
4. **Enable account lockout policies.**

### Findings
The log entry indicates a failed SSH login attempt for the user "admin"
from the IP address 185.220.101.34. The reputation check reveals that
this IP is associated with a high risk level and is identified as a
Tor exit node, which is often used for malicious activities.

### Recommended Actions
1. **Immediately block the IP address (185.220.101.34) at your firewall**
2. **Reset the password for the "admin" account**
3. **Investigate any successful logins from this IP address**
4. **Implement account lockout policies**
Inspecting Tool Usage
We can see which tools the agent decided to use:
print("\n🔧 Tools used by the agent:")
for msg in result["messages"]:
    if hasattr(msg, "tool_calls") and msg.tool_calls:
        for tc in msg.tool_calls:
            print(f"   → {tc['name']}")
Output:
🔧 Tools used by the agent:
   → parse_syslog
   → check_ip_reputation
   → get_playbook
The agent autonomously decided to:
- Parse the log first
- Check the IP reputation
- Get the appropriate playbook
No explicit instructions needed! The agent read the docstrings and figured out which tools were relevant.
How Agents Make Decisions
The ReAct Pattern
Most LangChain agents use the ReAct (Reasoning + Acting) pattern:
User: "Analyze this log: Jan 22 sshd Failed password from 185.220.101.34"

Agent Thinking:
  1. THOUGHT: I need to parse this log first
  2. ACTION: parse_syslog("Jan 22 sshd...")
  3. OBSERVATION: Timestamp: Jan 22, Host: webserver01...

  4. THOUGHT: Now I should check if this IP is malicious
  5. ACTION: check_ip_reputation("185.220.101.34")
  6. OBSERVATION: Risk Level: HIGH, Type: Tor Exit Node

  7. THOUGHT: This looks like a brute force attack, I should get the playbook
  8. ACTION: get_playbook("brute_force")
  9. OBSERVATION: 1. Block the attacker IP...

  10. THOUGHT: I have all the information, let me summarize
  11. FINAL ANSWER: [Summary with all findings and recommendations]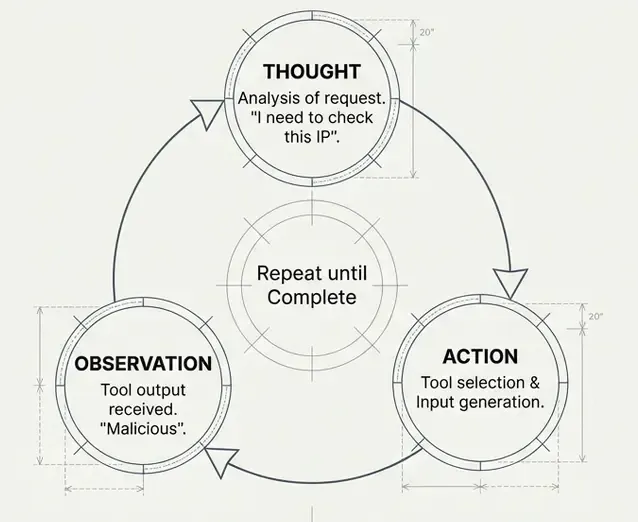
Tool Selection Criteria
The LLM selects tools based on:
- Docstring match: Does the tool description match the task?
- Parameter fit: Can it provide the required parameters?
- Context: What information does it have so far?
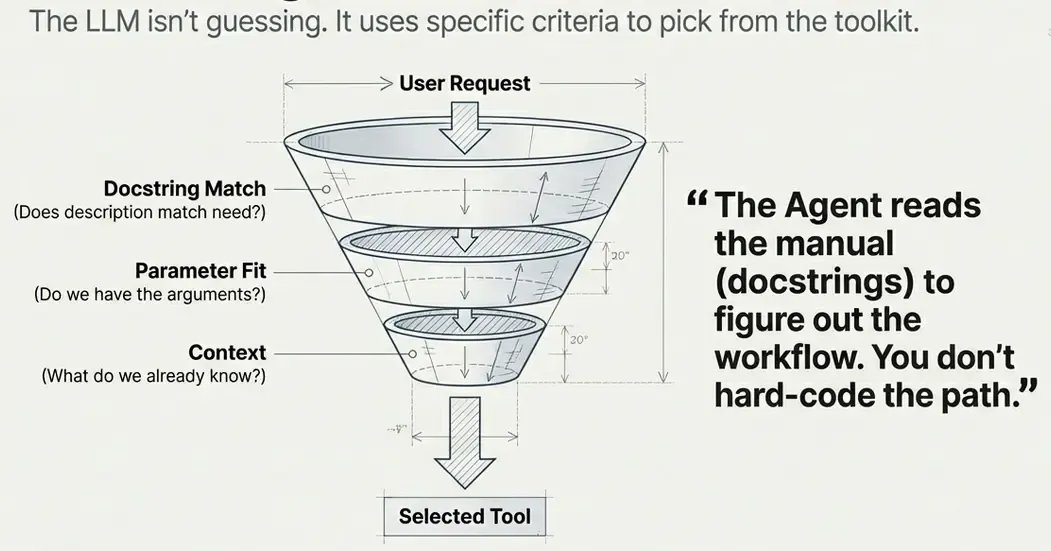
This is why well-written docstrings are crucial:
# ❌ Bad docstring - too vague
@tool
def check_ip(ip: str) -> str:
    """Check an IP."""
    ...

# ✅ Good docstring - clear purpose and usage
@tool
def check_ip_reputation(ip_address: str) -> str:
    """
    Check the reputation of an IP address.

    Returns risk level and threat information.
    Use this to investigate suspicious IPs.
    """
    ...
Summary
We built 5 tools from scratch:
| Tool | Purpose | Key Concept |
|---|---|---|
extract_iocs | Find IoCs in text | Regex patterns |
check_ip_reputation | Check IP risk | Dictionary lookup (mock API) |
parse_syslog | Parse log lines | Regex groups |
create_timeline | Order events | List sorting |
get_playbook | Get response steps | Simple database |
Key Takeaways
@tooldecorator — Converts any function into a LangChain tool- Docstring is critical — It tells the LLM how to use the tool
- Return strings — Tools should return human-readable strings
- Keep it simple — Tools should do ONE thing well
- Agents decide — Give them good tools and they’ll figure out when to use them
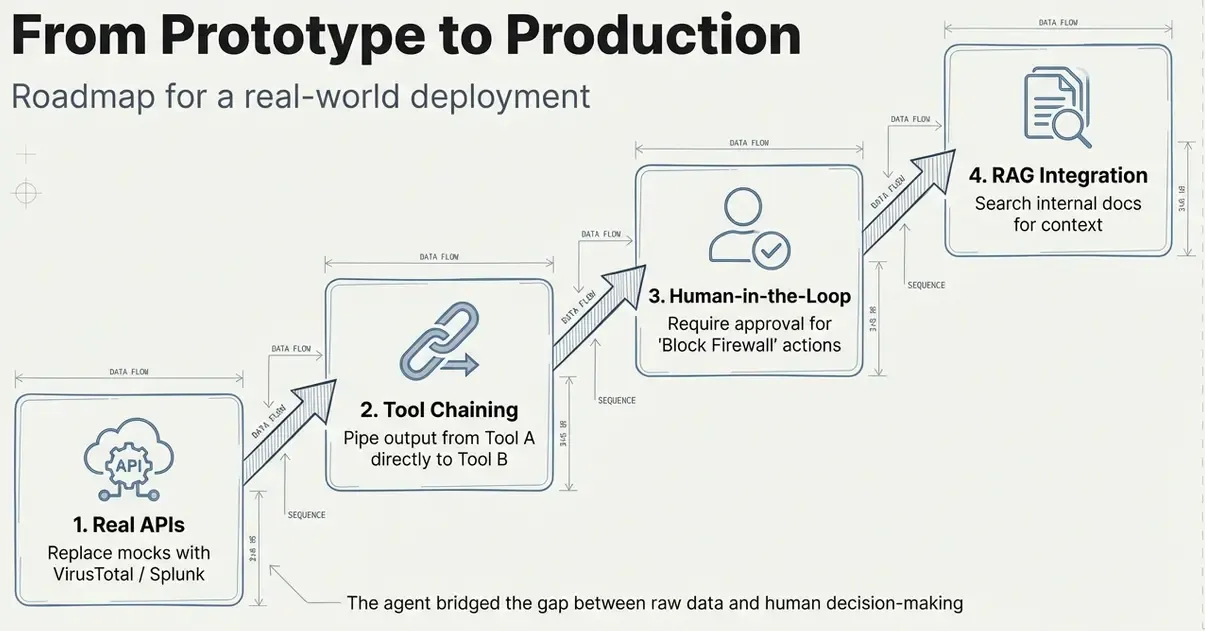
What’s Next?
In future, we could improve this agent by:
- Production tools: Calling real APIs (VirusTotal, TheHive, etc.)
- Tool chaining: Complex workflows with multiple tool calls
- Human-in-the-loop: Requiring approval for dangerous actions
- RAG + Tools: Combining document retrieval with actions
Resources
- LangChain Tools Documentation
- LangChain Agents Guide
- ReAct Paper — The pattern behind tool-using agents
- Previous Post: Building a RAG System